18 Sorting and Filtering Data
Sorting and Filtering Data
Learning Objectives
- Sort data by one column
- Perform a multi-level sort involving data in different columns
- Filter data using column headers
- Filter data using a custom filter
- Create custom lists.
Sorting One Column
Follow-along file: Continue with Excel Objective 5.00. (Use file Excel Objective 5.03 if starting here.)
Integrity Check – Sorting and Filtering Data Without a Table
Sorting and filtering data does not require your data be in a table. Any range of contiguous data can be filtered by clicking on the Sort button from the Data tab. When selected, the same column header drop-down boxes will appear in your data range.
The records in the Asset record table appear in the order they were entered. There will be times when you are working in a data table, or creating reports, that you will want to see records sorted in a different order. For example, you may want to sort records by department, by make of car, or by odometer reading.
Data can be sorted in:
- Ascending order: lowest to highest, dates oldest to newest, or A to Z.
- Descending order: highest to lowest, dates newest to oldest, or Z to A
Data can be quickly sorted by using the drop-down arrows to the right of each of the column headers. When you click on the arrow you will see the sort functions A to Z, or Z to A. Note: you cannot use the sort for more than one column. If you want to sort by multiple columns you must use the Sort button from the Data ribbon tab.
Suni wants to see the table sorted by department to see how many vehicles are in each department. The steps to accomplish this are:
1. We want to maintain the integrity of our raw data, so we will copy the Raw Data worksheet and make our changes in the new worksheet. While holding the Ctrl key down, left click the worksheet tab and drag to the right. You will see a little image of a piece of paper with a +. Drop the worksheet to the right of the original worksheet. The new worksheet will have the name Raw Data (2)
2. Rename the new worksheet College Vehicles by double clicking on the worksheet tab, eliminating the title there and entering the new title.
3. Click on the drop-down next to the Department column header. See Figure 5.4
4. Select the A to Z sort. Data is sorted with Athletics first, ending with Telecom.
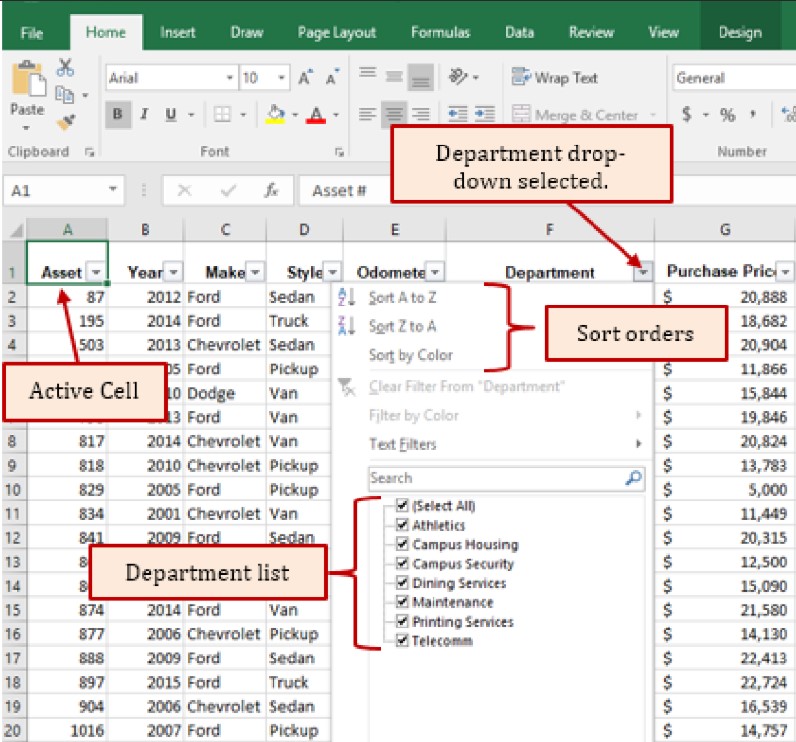
Notice that the active cell in Figure 5.5a is A1. However, the drop-down selected was for the Department as indicated by the department names at the bottom of the list.
Multi-Column Sort
Using the drop-down in a table column makes a one series sort very quick and easy. However, trying to sort by multiple columns does not work using this method. As soon as you click on another column and perform a new sort, the original sort you created in the first column is overwritten by the new sort applied. You were briefly introduced to the Sort dialog box in Chapter1 for a single column sort. In this section, we will be dealing with performing a multi-column sort using the Sort dialog box.
The first thing that must be decided when performing a multi-column sort is what will be the primary sort, secondary, and so on.
Suni, after looking at the sort, decides that a better view would be to sort by Department, then by Style, by Make, and finally by year purchased with the latest models first. To perform this multi-column sort, we will perform the following steps:
1. Have an active cell anywhere within your table or range.
2. From the Sort & Filter section of the Data ribbon, select Sort.

3. The sort dialog box will appear.
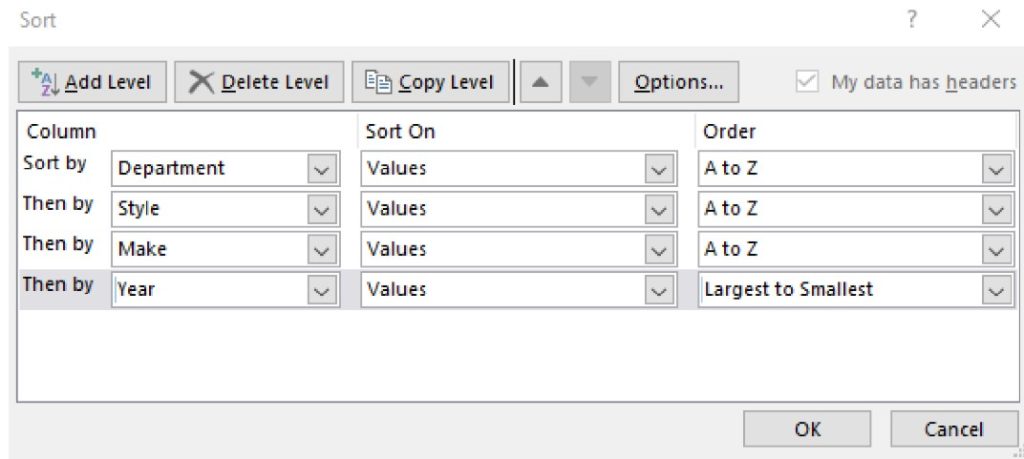
4. The first dialog box in the Sort is the Column. Whichever column contains your active cell will be the default Sort by in the column. The drop-down next to the column will have all of the column headings. Remember that Suni wants to sort by department first. From the drop down select Department. Note: My data has headers at the top right of the dialog box must be checked or Excel will treat your headers as part of the table data.
5. In the Sort On field, select what cell contents the sort will focus on. The choices in the list are:
- Values – this is the default. Whatever value is in the cell will be used for the sort.
- Cell color – if cells have a conditional formatting, or highlighting, that fills a cell with color, it can be used in the sort. When selecting this option, a color selection box will be added to the Add level row. A second new selection box will appear that asks if the cell color should be on top of the other items in the column, or at the bottom.
- Font color – – if contents of cells have a font color other than black, it can be used in the sort. When selecting this option, a color selection box will be added to the Add level row. This choice will also get the second box that asks where the cells containing color should be place in the sort order.
- Icons – Excel 2016 allows the placement of icons in a cell. This concept is not covered in this book, but if placed in a cell can be used as a sort.
6. The last field in the Sort is the Order field. You can sort in Ascending, Descending, or by a Custom List. (See Creating a Custom List in Section 5.2 Sorting and Filtering.) The default sort for text is A to Z. We will accept the default.
7. Click on Add level at the top right of the Sort dialog box. A new level will be added to the sort dialog box. In the dialog box for the Then by, select Style from the drop-down list. Note: you can change a level by re-selecting from the drop-down. You can also delete a level by clicking on the row and clicking on Delete Level.
8. Add another level for the Make.
9. Add a final level for the year purchased. Change the Order for the Year to Largest to Smallest, so the newest vehicles are displayed first.
10. Click OK.
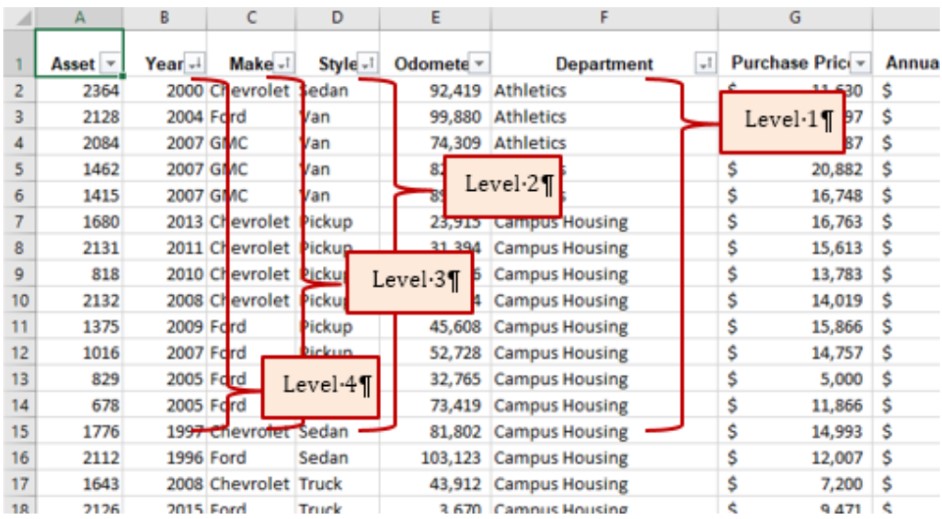
Note that after a sort is applied you will see arrows in the filter buttons next to the column headers indicating the column has been sorted and in which order (up or down) the sort was performed.

Skill Refresher – Multi-Level Sort
- Click any cell in a table or range.
- In the Sort & Filter dialog box on the Data tab, click the Sort button.
- Click the Sort by arrow, select the column heading for the primary sort field.
- Change the Sort On if necessary.
- Select the Order of sort. Ascending, Descending, or Custom.
- To sort by additional columns, click the Add Level button.
- Click the OK button.
Sort Using a Custom List
Follow-along file: Continue with Excel Objective 5.00. (Use file Excel Objective 5.04 if starting here.)
There may be times when entering repetitive entries like days of the week, or sorting alphabetically or numerically in descending or ascending order doesn’t give you the results you want to see. An example of this that we use often is sorting by the days of the week, or by months in the year. If we sorted those alphabetically, we would come up with the jumbled orders you see in Table 5.1.
| Friday | April |
| Monday | August |
| Saturday | December |
| Sunday | February |
| Thursday | January |
| Tuesday | July |
| Wednesday | June |
| March | |
| May | |
| November | |
| October | |
| September |
There may also be times where you would sort by a specific part number order, or name. In cases like these, you need to sort using a custom list. There are several custom lists already established in Excel. They include the days of the week and the months in the year. You saw the custom lists in action when we filled the months down a column using the auto fill feature. The auto fill feature will also draw on any custom lists established in Excel. You may even want to edit a custom list that is already set up. For instance, if you only want to fill Monday – Friday as the days of the week, you can edit the days of the week list to eliminate Saturday and Sunday from the list. Note: custom lists apply in all your workbooks. If you edit the days of the week list, it will be available in all your workbooks.
Suni wants to see the departments sorted in the following order:
- Athletics
- Campus Housing
- Campus Security
- Printing Services
- Dining Services
- Telecom
- Maintenance
We will look at the custom lists already set up and set up a custom list for sorting the departments in an order different than alphabetically.
1. From the Sort & Filter section of the Data tab, click on the Sort button. The sort you established in the last section will be displayed.
2. In the Department row, click on the drop down next to the Order box.
3. Select Custom List. The Custom Lists dialog box will be activated.
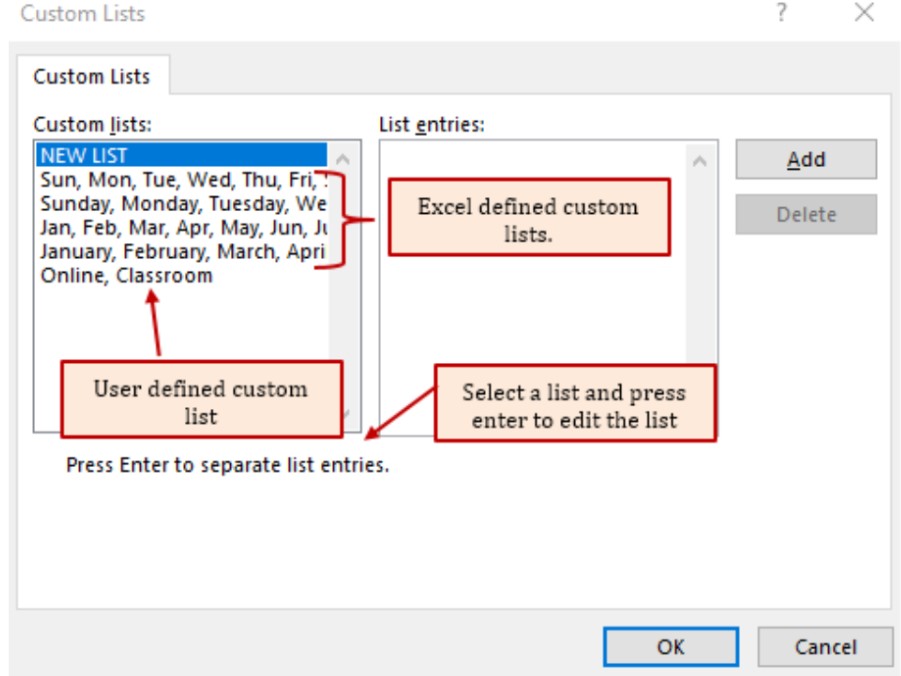
4. The NEW LIST option is automatically highlighted. Press Enter to create a new list or click in the List Entries box.
5. Type the departments in the order that Suni gave you, or you can copy the list and paste if from another source if available.
6. When finished, click OK. Note: Pressing enter will only move you down to a new row in your list.
7. Your custom list now shows in the Order box.
8. Resort the list by clicking OK. Your table is now sorted according to your custom list in the order Suni wanted.
Skill Refresher – Creating a Custom List
1. Select a range of data, (can only be one cell containing data.)
2. Click the Sort button in the Sort & Filter section of the Data tab.
3. Select New list, or an established list if editing the list.
4. Generate the list in the List Entries box.
5. Click OK when finished.
Before we wrap up the Sort section, let’s put a good title on our worksheet that describes what we have done to the worksheet. Remember, that each worksheet must tell a story to the reader. To describe out story for this worksheet, we will describe the sort we did in the worksheet and what data the worksheet represents.
1. Merge and center cells A1:J1.
2. Click in the grey area of row 1, when you see the black arrow pointing right, hold your left mouse button down and drag down to row 2. Both rows 1 and 2 should be selected.
3. Using keyboard commands, hold down the Ctrl key and click the + key on your ten-key keypad if you have one. If you don’t have one then hold down the Ctrl key, the shift key, and the + keys. This will add two rows at the top of your document.
4. Insert the following title in row 1. Remember to hold the Alt key and press enter at the end of each row to wrap the text in the cell.
Minnesota State College
Vehicles Sorted by Department
Report date: 3/1/2025
Remember that for a range of data to be able to sort, filter, create a table, that data cannot have cells containing other information immediately adjacent to the data headers.
As we progress through the rest of Chapter 5, we will modify the report title to reflect how we have modified our data.
Key Takeaways
- When creating a multi-level sort, decide your sort order first.
- Create a multi-level (column) sort by using the Sort button in the Sort & Filter section of the Data tab.
- A custom sort can be created from the Sort button, Order box, and typing a new list.
- Custom sort lists are available across all your worksheets.
Media Attributions
- Table DropDown Sort
- Creating a Multi-level Sort
- Sort Results
- Custom Lists Dialog Box
