11 Data Validation
Data Validation
Learning Objectives
- Learn the types of data validation.
- Use data validation to control data entry into fields.
Some of the documents you will prepare for your business will be what are called templates. A template is simply a pre-made form that others can use to complete the work for a company. A common template would be a sales invoice form. On the invoice, you would want your salespeople to be able to select from a drop down of products and have the resulting selection fill in the price per unit and the product description. The salespeople could enter the number of units, but could not change the description fields or the price fields. We will look at the use of data validation to help limit what can be entered into fields. For this conversation, we will describe a cell as a field.
When a data validation rule is created, you can specify what kind of data is allowed. You can also prohibit the entry of anything other than the allowed data, you can warn that the data is not what is expected, or you can just let the data be entered with an explanation of what is expected to be in the field.
| Criteria Type | Description |
| Any Value | This is the default when no data validation is applied. |
| Whole number | Limit entries to whole numbers (no decimal places allowed). A range of acceptable whole numbers (integers) can be specified. |
| Decimal | Any type of number, including percentages. A range of acceptable values can be specified. |
| List | Any value in a range or entered in the Data Validation dialog box separated by commas. |
| Date | Limited to dates only. You can specify acceptable date ranges. |
| Time | Times only. You can specify acceptable time ranges. |
| Text Length | Text limited to a specific number of characters – for instance a phone number would be considered text and be a specific length. |
| Custom | Values based on the results of a logical formula. |
Data Validation List – Created Source
Follow-along file: Continue with Excel Objective 3.00. (Use file Excel Objective 3.14 if starting here.)
We will use data validation to create a buy/sell form for the various investments. The steps we will use to do this are:
1. Activate the Buy/Sell worksheet. We use a different data validation rule in each of the cells in the range B3:B7.
2. In cell B3, we will create text data validation rule that describes the type of transaction this will be. Click in cell B3. From the Data Tools section of the Data ribbon, use the drop-down button to select Data Validation.

3. In the Data Validation dialog box, use the drop-down button next to the Allow: box and choose List.
4. In the Source field, type Buy, Sell. Make sure the two words are separated by a comma.
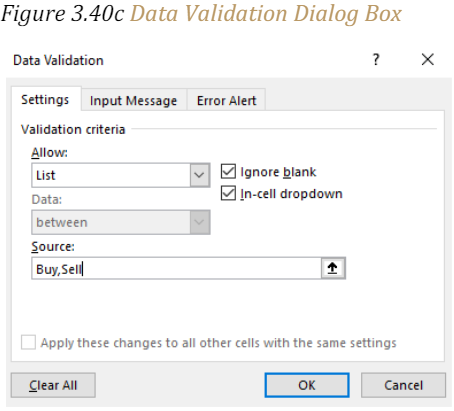
5. Click on the Input Message tab. In the tile type Buy/Sell.
6. In the Input message field type: Select the type of transaction you are ordering.
7. Click the Ok button.
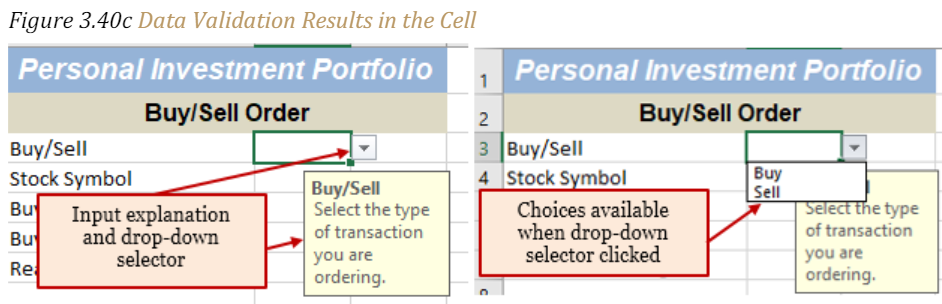
8. Note that cell B3 now has a drop-down arrow next to the cell. When the cell is active, the input message you just entered will show below the cell. When clicked, the drop down will show the choices available for what can go in the cell.
Data Validation List – Named Range
Data validation can also be used to create a list using a range of cells. If you are going to use a range of cells there are two rules you must follow:
• The range of cells must be on the same worksheet as the data validation cell, OR
• Use a named range of cells from a different worksheet. The named range must be one column or one row of data only.
The steps we will follow to create a drop-down list for the investment symbols are:
1. Select Sell from the drop-down list.
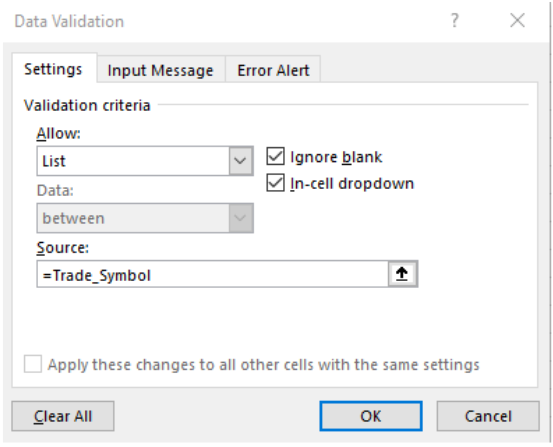
2. Cell B4 will contain the stock symbol for the investment to be traded. We will use a named range to create the data validation list for this cell. Go to the Investment List worksheet. Highlight the range B3:B22 From the Defined Names section of the Formula Ribbon, select Define Name.
3. In the Define Name section, type in Trade_Symbol. (Don’t forget to use the underscore between the words Trade and Symbol. Defined names cannot contain spaces.)
4. Go back to the BuySell Order worksheet and make cell B4 active.
5. From the Data ribbon click the data validation drop-down list and select List in the Allow box.
6. Click in the Source box. From the Defined Names section of the Formula ribbon, select Use in Formula. Scroll down the list of names until you see Trade_Symbol. Click on Trade_Symbol. (Excel will insert an = sign before the named range.)
7. Click on the Input Message and type: Select the investment symbol from the list.
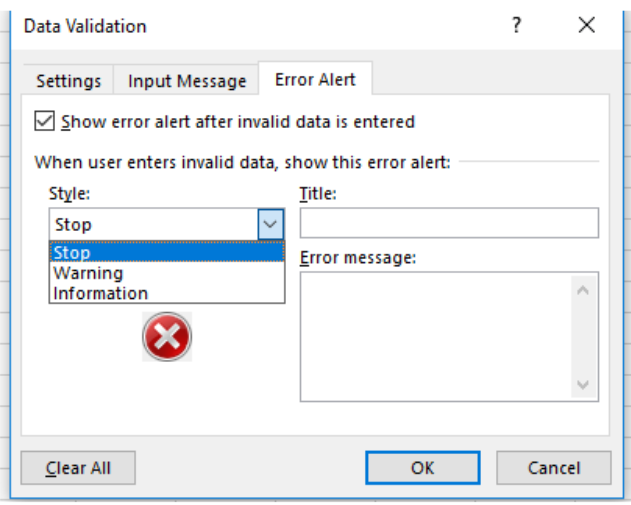
8. Click on the Error Alert.
9. There are three options for the error alert dialog box. Stop: the data that is being input must match the data allowed. Alert: the data does not match, and the user must choose to proceed or not, and Information: the user will be alerted that the data does not match, but no choice will be given before the data can be entered.
Integrity Check – Data Validation Input Message
Every cell that has data validation should have an input message to alert the user as to what should be entered into the cell and the types of data the cell will accept.
10. Because this is a buy/sell situation, we may be buying an investment that is not already in the portfolio. We will select a Warning message that will alert the user that the symbol is not in the list of currently owned investments.
11. On the Error message box type: That investment symbol is not in the list of owned investments.
12. Click OK.

13. Try typing a symbol into B4 that is not in the list. You will get an error message, but you will also get the choice to proceed or not. Choose to not proceed. Delete the characters you entered from B4 and select VFICX from the drop-down list.
14. Select cells A3:C3. Right click and Insert. Shift cells down, and then click OK.
Data Validation – Date
Next, we will validate the transaction date to ensure the date of the order will be today or later. The steps we will use are:
1. Insert a row at A3 by highlighting A3: C3. Then use the Ctrl and + keys to insert cells. Select Shift Cells Down.
2. In Cell A3 type: Today’s Date:
3. In cell B3 type the formula =TODAY() Note: this will insert a dynamic formula that will change each time the workbook is opened to reflect the current date.
4. Activate cell B6. Open the data validation dialog box and select Date from the list of options.
5. New Data choices will be given:
| Between | Enter a start and end date. |
| Not between | The date entered cannot be between the dates indicated. |
| Equal to | Must be the exact date entered. |
| Not equal to | Can be any date but the date designated. |
| Greater than | Must be after the specified date. |
| Less than | Must be before the date entered. |
| Greater than or equal to | Can be equal to or after the designated date. |
| Less than or equal to | Must be the designated date or before. |
6. Select greater than or equal to. We can’t tell the broker to sell something yesterday-only today or later.
7. Tab to the Start date box. Click on cell B3 as the start date. This will dynamically link your valid date the TODAY() function.

8. Click on the input message tab and in the Input message box type: Trade date must be today or after today’s date.
9. Click the Error Alert tab, select Stop as the alert. In the Error message type: Date entered is before today’s date. Note: your error message should always inform the user why the error has occurred.
10. Put yesterday’s date into the cell. Excel will stop you and tell you why the entry is invalid.
11. Enter tomorrow’s date into B6.
Data Validation – Number
1. Click on cell B7. In this cell, the price will be entered. We will control the entry to be a number with 0 decimal places.
2. From the data validation settings dialog box, select Whole Number.
3. In the Data box select greater than
4. In the Minimum box type in 0.
5. In the Input Message tab type: Enter the buy/sell price in whole numbers. We won’t have an error message for this cell.
6. On the Home ribbon format cell B7 for $ with 0 decimal places.
Data Validation – Text
The last validation we will add to our worksheet it a text validation to limit the number of characters the user can add when explaining why the investment is being bought or sold. The steps we will use to do that are:
1. Make cell B8 active. Because we are looking for a buy/sell reason, we will make cell B8 accept text input only.
2. From the data validation Settings Allow drop-down, select Text length.
3. In the Data box select: less than.
4. In the Maximum box type: 100. Note: this will limit the number of characters to less than 100.

5. For the input message type: Enter reason for buying/selling.
6. Do not put in an error alert.
7. In cell B8 type: Not hitting target

Data Validation – Calculated Field
While not using a specific example in this worksheet, we can create a data validation based on a calculation. For example: We can have the data validation test to see if the value entered is at least 5% of a value in another cell. The calculation must begin with an =.

Key Takeaways
- Always include an input message for cells containing data validation.
- Protect the types of information that can be entered into a cell by using data validation.
- A data validation list can help eliminate spelling and data input errors.
